The Gemstone Butterfly Cut
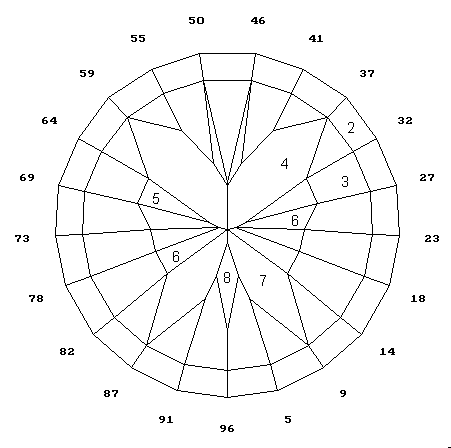
The Gemstone Butterfly is a stunning design for a custom-cut gem. Our step-by-step guide will show you how to facet this piece and suggest some variations.
2 Minute Read
Comments
The Gemstone Butterfly was originally designed with 42º pavilion mains. Even though a majority of the pavilion is cut at this angle, it has very little brilliance. In this variation, it has been made thinner, as if you were going to cut it in garnet or some other dark material. Here, the emphasis is on the design, not brilliance. It can be converted back to 42º mains, or made thinner to accommodate your rough. Use the "keep your distance" rule" and add or subtract the same amount to each setting.
The Gemstone Butterfly: A Step-By-Step Guide
| Step | Angle | Index |
| 1 | 90º | 02-07-11-16-21-25-30-34-39-43-48-53-57-62-66-71-75-80-85-89-94 |
| 2 | 45º | 02-07-11-16-21-25-30-34-39-43-48-53-57-62-66-71-75-80-85-89-94 |
| 3 | 35º | 02-07-11-16-21-25-30-34-39-43-48-53-57-62-66-71-75-80-85-89-94 |
| 4 | 32º | 37-59 |
| 5 | 32º | 30-66 |
| 6 | 32º | 16-21-26-70-75-80 |
| 7 | 33.4º | 09-87 |
| 8 | 33.8º | 96 |
| 9 | 34.2º | 46-50 |
- Create girdle.
- Girdle facets.
- Leave frosted. These facets outline the design and also determine how far in the edge of the wings are.
- The first wing facets are cut to the edge of the 45º facets in Step 2.
- Cut the remaining wing facets to the outer edge of the previous wing facet. They will not meet perfectly in the center.
- Cut the remaining wing facets to the outer edge of the previous wing facet. They will not meet perfectly in the center.
- Cut the remaining wing facets to the outer edge of the previous wing facet. They will not meet perfectly in the center.
- This is the abdomen. Cut on the pre-polish lap and position by eye.
- The antennae are very tiny. Cut on the polishing lap!
Techniques
The butterfly is highlighted by leaving the surrounding facets frosted. While that may seem pretty straightforward, there is a trick to the technique. Essentially, you want to bring them down to as fine a finish as possible without taking them to a semi-polished look. Usually, you can do this with a 1,200 lap, but you may need to use a 600 in some cases.
Why should you avoid the semi-polished look? Because once you reach the polishing stage, if you try to polish next to a much rougher surface, like a 360, small bits of the rough will break off and scratch your facets. Worse yet, they could get embedded in your polishing lap!
You'll notice I haven't listed any crown settings. In the diagram below, the crown is step-cut with two rows of facets cut at 35º and 25º, using the index setting in Step 1. In a design like this, leaving the table as large as the interior design is usually desirable. That isn''t a high priority in this case. I have cut these with the crown facets overlapping the wing tips and the results are not only satisfactory but also quite pleasant.
If you have the skill, try to cut a domed crown with cabbing equipment. Remember, the thinner the crown, the more the butterfly will be magnified.
Donald Clark, CSM IMG
Related Articles
Slayer: Faceting Design Diagram
Boss: Faceting Design Diagram
Pat’s Points: Faceting Design Diagram
Tangier: Faceting Design Diagram
Never Stop Learning
When you join the IGS community, you get trusted diamond & gemstone information when you need it.
Get Gemology Insights
Get started with the International Gem Society’s free guide to gemstone identification. Join our weekly newsletter & get a free copy of the Gem ID Checklist!
