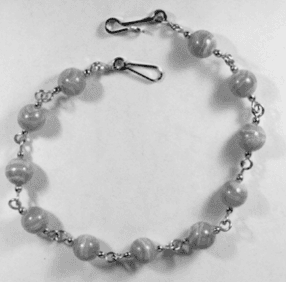
Make a Bracelet
A step by step procedure on how to make a bracelet. Detailed information on tools and materials needed. Read and Understand instructions to complete steps.
3 Minute Read
This article is compliments of the Wire Artist Jeweler. If you would like to learn more about wire wrapping, go to their web site at www.wag.on.ca.
| Simple Beginners' Project This Beginners' Project was published in the March 1999 issue of Wired. |
| BEFORE PICKING UP YOUR TOOLS AND CUTTING ANY WIRE, PLEASE READ THESE INSTRUCTIONS THROUGH CAREFULLY AND COMPLETELY TO MAKE SURE YOU UNDERSTAND THEM! |
| START HERE! |
|
|
| 5. Now, with your round-nose pliers, begin to curl the wire in. | |
| 6. Continue to curl it into a loop until it meets and forms a circle. | |
| 7. Repeat steps 1 to 6 until you have used up all 11 pieces of the wire you prepared. All of your bead links are now done. To join them together, take your flat-nose pliers and open up one of the loops sideways (below), link another loop onto it (below, right) and close again sideways with your flat-nose pliers (bottom, right). Continue Step No. 7 to link all of the beads together. |
| 8. Make two S hooks to go on either end of the bracelet. (See January's beginners' project.) |
| 9. Cut a 2-1/2 inch length of 22 square hard wire. With your round-nose pliers, make a loop at each end of the wire as shown at right. | |
| 10. With your round-nose pliers still in the loop, pull back slightly to centre the loop. Do both loops. | |
| 11. With your round-nose pliers, hold the wire in the centre and slowly bring it around so you have a U bend, and the two loops meet evenly. |
|
|
| 18. Attach this hook to your bracelet by opening your S hooks sideways and closing them again. Use the eye described in February's beginners section for the other end of your bracelet. You're done! You should now have something that resembles the illustration at right. | |
| All designs and images on this website are © 1999 by the Wire Artists Group. All rights reserved. Any unauthorized use, reproduction, or transfer of the site or its content, in any medium, is strictly prohibited. |
International Gem Society
Related Articles
Money-Saving Ways to Clean Jewelry
Some household products and do-it-yourself methods can clean jewelry safely and save you money. Discover the common ingredients in some...
Read More
Casting Platinum Sterling – A New Alloy
This new alloy is called Platinum Sterling, and is mostly fine silver with a modifier of Platinum in it (4-6%)....
Read More
The Techniques of Master Wire Wrapping
Gerald Wykoff has gained worldwide recognition for his "Master's" series of gemological and lapidary books. The first, Beyond the Glitter,...
Read More
The Wire Artist Jeweller
This is a neat, simple, project that will teach you how to string beads with wire. You can take these...
Read More
Never Stop Learning
When you join the IGS community, you get trusted diamond & gemstone information when you need it.
Get Gemology Insights
Get started with the International Gem Society’s free guide to gemstone identification. Join our weekly newsletter & get a free copy of the Gem ID Checklist!
